The board can work as a standalone USB HID, using the Fingerprint PC application, or as an SPI slave communicating with a host MCU. USB HID is a USB human interface device.
Features and usage notes
CMOS image sensor
A CMOS image sensor is the main component in most digital cameras today. Compared to a CCD sensor it has low power consumption and low dissipation.
To distinguish between 2D images and a real fingerprint the CMOS image sensor has a special lens and covering. Considering how dark it is when you press your finger to the lens, an LED illuminates it from one side, while the other side does the job of sending the image through the lens to the processor.
Windows application
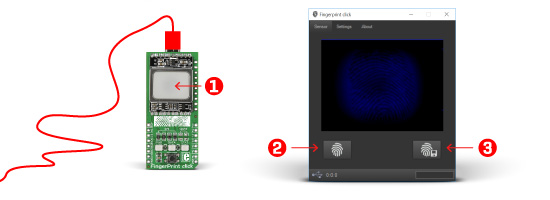
Fingerprint click carries an STM32 MCU for processing the images and forwarding them to an external MCU or PC. We created a Windows application that provides an interface so you can easily use the Fingerprint click. The following steps describe how the application works:
- 1.Place your finger on the sensor on the click.
- 2.Press the button in the bottom, left corner of the screen.
- 3.After you see the image of your fingerprint, press the button at the bottom, right corner of the screen to save the image. If you want to add more fingerprint images just repeat the process.
Pinout diagram
This table shows how the pinout on Fingerprint click corresponds to the pinout on the mikroBUS™ socket (the latter shown in the two middle columns).
| Notes |
Pin |

mikroBUStm
|
Pin |
Notes |
| MCU ready pin |
READY# |
1 |
AN |
PWM |
16 |
NC |
|
|
NC |
2 |
RST |
INT |
15 |
NC |
|
| SPI chip select pin |
CS# |
3 |
CS |
TX |
14 |
MCU_RX |
UART transfer pin |
| SPI clock pin |
MCU_SKC |
4 |
SCK |
RX |
13 |
MCU_TX |
UART receive pin |
| SPI master in slave out pin for the MCU |
MCU_MISO |
5 |
MISO |
SCL |
12 |
NC |
|
| SPI master out slave in pin for the MCU |
MCU_MOSI |
6 |
MOSI |
SDA |
11 |
NC |
|
| +3.3V power input |
3.3V |
7 |
+3.3V |
+5V |
10 |
NC |
|
| Ground |
GND |
8 |
GND |
GND |
9 |
GND |
Ground |
Programming
This code initializes SPI communication and the TFT display. After waiting for the Fingerprint click to go out of bootloader mode, the MCU sends a series of SPI commands for the Fingerprint to capture and send the fingerprint image. Every image byte received from the click is being sent onto the TFT display
 1 void main()
 2 {
 3     SPI3_Init_Advanced( _SPI_FPCLK_DIV2, _SPI_MASTER | _SPI_8_BIT |
 4                     _SPI_CLK_IDLE_LOW | _SPI_FIRST_CLK_EDGE_TRANSITION |
 5                     _SPI_MSB_FIRST | _SPI_SS_DISABLE | _SPI_SSM_ENABLE |
 6                     _SPI_SSI_1, &_GPIO_MODULE_SPI3_PC10_11_12 );
 7
 8      GPIO_Digital_Output( &GPIOD_BASE, _GPIO_PINMASK_13 );
 9      Delay_ms(3000);
10
11
12      TFT_Init_ILI9341_8bit(320, 240);
13      TFT_Set_Pen(CL_BLACK, 1);
14      TFT_Set_Font(TFT_defaultFont, CL_BLACK, FO_HORIZONTAL);
15      TFT_Fill_Screen(CL_Aqua);
16
17      TFT_Write_Text("TFT Initialized, waiting for fingerprint click",10,10);
18      Delay_ms(1000);
19      TFT_Set_Address_Ptr(0,0);
20      delay_ms(10000); // wait for the click to go out of bootloader mode
21
22
23      TFT_Write_Text("Fingerprint ready test...", 10, 50);
24      fingerprint_is_ready();
25      TFT_Write_Text("passed", 200, 50);
26
27      TFT_Write_Text("Fingerprint capture image...", 10, 70);
28      fingerprint_capture_image();
29      TFT_Write_Text("passed", 200, 70);
30
31      TFT_Write_Text("Displaying image", 10, 90);
32      delay_ms(3000);
33      fingerprint_display_image();
34      fingerprint_end_image_transfer();
35
36 }